Configuring Library Loader for xDX Designer/xPCB Layout
1 – Click Settings in Library Loader.

2 – If you are using xDX Databook to populate symbol property values, check “Create xDX Databook Ready Symbols”.

3 – To prevent these instructions from showing every time you download a part, please uncheck “Show Library Import Instructions”. If you want to review these at any point, you can click the Help link in the same dialog.

4 – Click OK to accept the Settings
Importing Xpedition data files using xDM Library Tools
Launch xDM Library Tools, and open your central library (*.lmc) file. This can be done stand-alone if you have the appropriate license or from xDX Designer (Tools->xDM Library Tools) or xPCB Layout (Setup->Libraries->xDM Library Tools…)
Padstacks (padstacks.hkp)
1. Select “Library Services…” from the Tools menu in xDM Library Tools

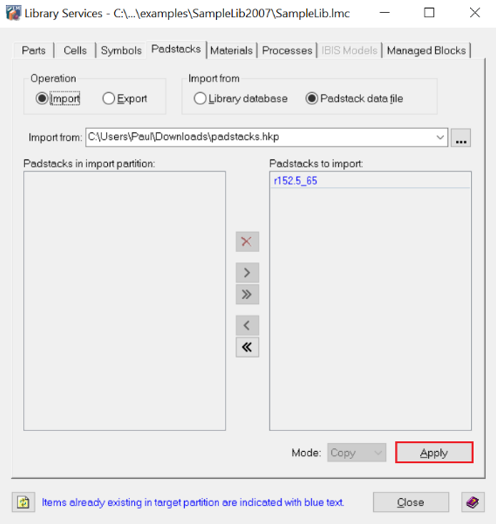
2. Click the “Padstacks” tab, and select “Padstack data file” for Import from.

3. Click “…” to browse to the padstacks.hkp file extracted from the downloaded part zip. This would have been extracted automatically into your Downloads Folder if the Library Loader App was running in the background. If not, this file can be extracted from the downloaded zip manually and can be found in the “Xpedition” folder. Then click “>>” to import all padstacks from this data file.

4. Click Apply to import the Padstack(s).

Cell (cell.hkp)
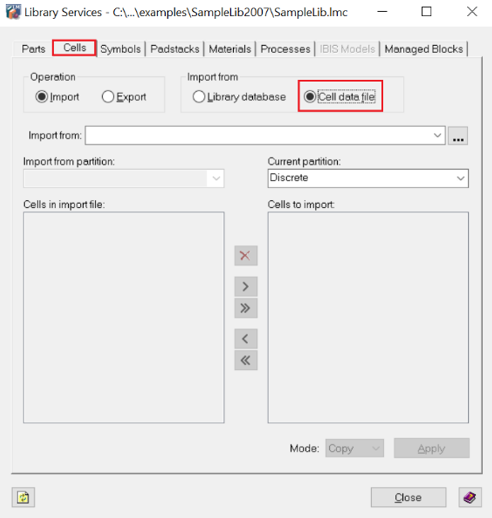
1. Click the “Cells” tab, and select “Cell data file” for Import from.

2. Click “…” to browse to the cell.hkp file extracted from the downloaded part zip. This would have been extracted automatically into your Downloads Folder if the Library Loader App was running in the background. If not, this file can be extracted from the downloaded zip manually and can be found in the “Xpedition” folder. Select the appropriate partition from the drop down and then click “>>” to import the cell from this data file.

3. Click Apply to import the Cell.

Part (pdb.hkp)
1. Click the “Parts” tab, and select “Part data file” for Import from.

2. Click “…” to browse to the pdb.hkp file extracted from the downloaded part zip. This would have been extracted automatically into your Downloads Folder if the Library Loader App was running in the background. If not, this file can be extracted from the downloaded zip manually and can be found in the “Xpedition” folder. Select the appropriate partition from the drop down and then click “>>” to import the part from this data file.

3. Click Apply to import the Part.

Symbol (*.1)
1. Select “Import Symbols…” from the File menu in xDM Library Tools. Look in your downloads folder, and select the downloaded part symbol file. This would have been extracted automatically into your Downloads Folder if the Library Loader App was running in the background. If not, this file can be extracted from the downloaded zip manually and can be found in the “Xpedition” folder.

2. Select the appropriate “Target partition” and then click “Open”.


3. The imported part with associated symbol and cell is now be ready to use from the library.


